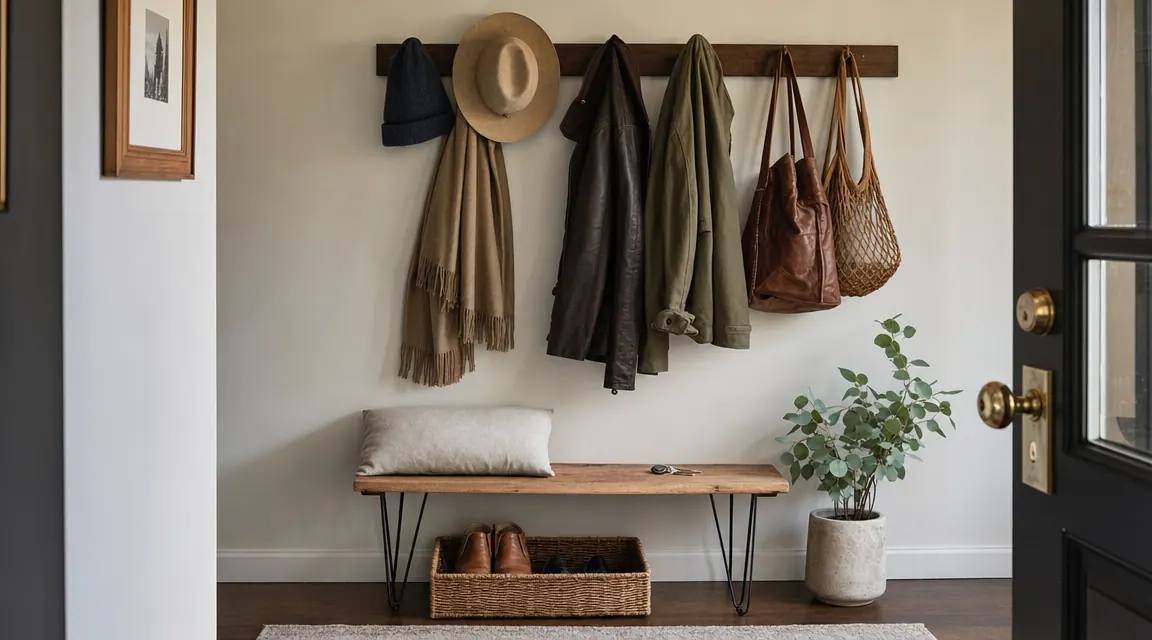
My entryway used to be a pile. Coats over the railing, bags on the floor, keys somewhere on the kitchen counter. Every morning I lost three minutes looking for something I had walked right past the night before. The problem was not the stuff. It was that there was no system for the stuff, and no system means everything lands wherever gravity takes it. A wall-mount coat rack fixes that. One board screwed into studs, five double hooks, a shelf on top, and suddenly everything has a place the moment you walk in the door.
I have mounted three of these racks across two homes now. The Homode 24-inch wall-mount coat rack is the one I keep recommending because it combines the hook count, shelf depth, and finish quality that cheaper racks skip. But the rack only works if you install it correctly and set it up so your household will actually use it. That is what this guide covers, from finding the right wall position to styling the shelf so it earns its space.
The coat rack I mount in every entryway I organize
The Homode 24-inch wall-mount coat rack packs 5 double hooks and a storage shelf into 24 inches of wall space. Rated 4.5 stars across nearly 3,000 reviews. Check today's price before you start this project.
Amazon Check Today's Price on Amazon →Step 1: Choose the Right Wall and Position
Before you put a single hole in the wall, spend five minutes standing in your entryway thinking about traffic flow. The rack needs to go on a wall where you can reach it without turning sideways around another person. In a standard single-family home entryway, that usually means the wall immediately to the left or right of the door, not the wall directly opposite it where you would have to walk past everyone to hang anything. In a narrow apartment hallway, use the wall that faces the longer dimension of the hall so the hooks do not jab anyone passing by.
Also check what is behind the wall. An interior wall shared with a closet is ideal because the studs are predictable and there are no plumbing lines. Exterior walls have studs too but may have insulation batts between them, which does not affect mounting but makes the stud finder more twitchy. Avoid mounting directly next to a light switch or outlet, where wiring runs vertically inside the wall cavity. Leave at least 6 inches of clearance from any electrical box. For the Homode 24-inch rack specifically, you need a continuous 24-inch run of wall with at least two studs in that span. Standard stud spacing is 16 inches on center, so a 24-inch rack will reliably hit two studs, sometimes three.
Mark your chosen position lightly with painter's tape before committing. Step back and look at it from the front door. Is it the first thing you see when you walk in, or is it tucked into an awkward corner? It should be visible and reachable in one or two steps. If it is around a corner or behind the door swing, people will skip it and the pile returns.
Step 2: Find Your Studs and Mark the Mount Height
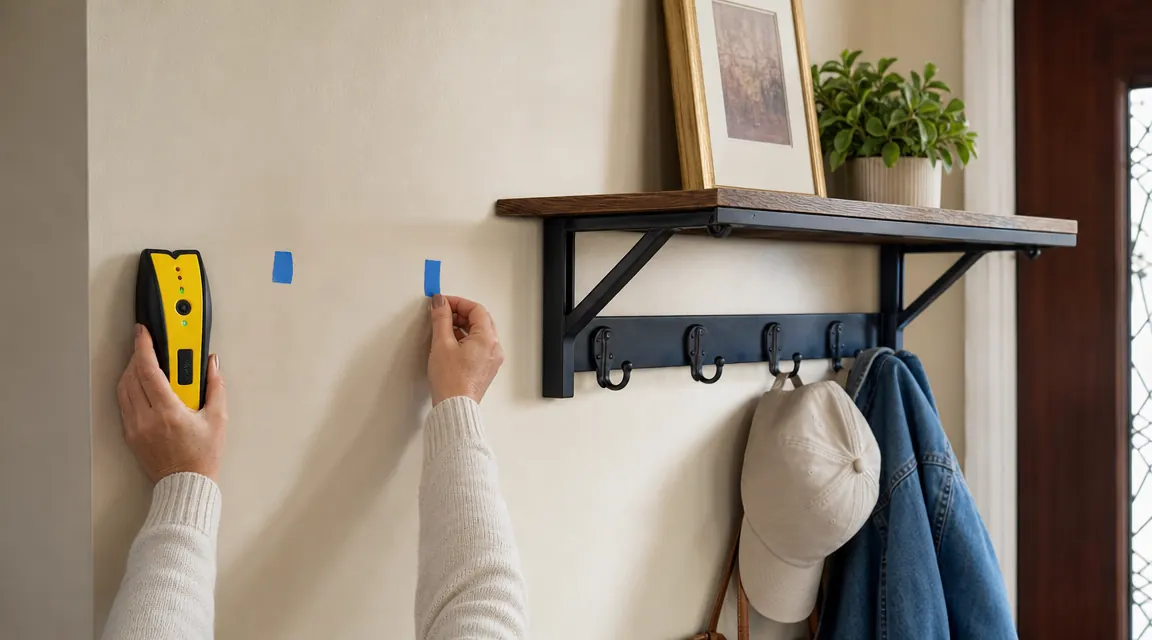
A coat rack loaded with winter coats, bags, and a couple of scarves can weigh 40 to 60 pounds. That weight has to go into studs, not drywall. Do not trust toggle bolts for a coat rack that will be yanked on daily. Use a stud finder. Run it slowly across the wall at the height where your top mounting holes will be, mark each stud edge with a small piece of painter's tape, then verify by tapping gently with your knuckle. A stud sounds solid; a hollow bay sounds hollow. If your stud finder is giving you inconsistent readings, try running it at a different height and cross-referencing with the baseboard nails, which are always driven into studs.
Mount height matters more than most people realize. The standard recommendation for a coat rack is 60 to 66 inches from the floor to the top of the hook. At 60 inches, a long parka will clear the floor with about 4 to 6 inches to spare. At 66 inches, you get more clearance for taller household members but the hooks start to feel out of reach for shorter adults and kids. If you have a mix of heights in your house, split the difference at 62 inches to the top hook. The Homode rack has a shelf above the hooks, so mount the bracket so the underside of the shelf sits at roughly 60 inches, which puts the hook tops around 54 to 56 inches. That keeps the shelf reachable while giving coats room to hang.
Step 3: Mount the Bracket Correctly
The Homode rack ships with a paper drill template and mounting hardware in the box. Use the template. Tape it to the wall at your marked height, level it with a bubble level (not your eye), and mark through the template holes with a pencil. Peel off the template and look at your marks. Every mark that lands on a stud gets a wood screw. Any mark that lands in drywall between studs should be shifted slightly or handled with a 75-pound-rated drywall anchor, though I strongly prefer to shift the template a half-inch rather than use anchors on a load-bearing rack.
Pre-drill pilot holes slightly smaller than your screw diameter. This prevents the drywall paper from tearing and makes the screw easier to drive straight. Drive your screws until the bracket sits flush against the wall with no rocking. If the bracket rocks on a stud mount, back out the screw a half turn, check that you hit solid wood and not the stud edge, and re-drive at a slightly different angle. Once the mounting bracket is solid, hang the Homode rack body onto it and confirm it does not shift or creak when you tug it forward. If it creaks, check that all mounting points are tight. A rack that moves when loaded will eventually pull the hardware loose.
One practical tip: mount the rack on a Saturday morning before your family is awake. Drilling takes about four minutes, but leveling and marking take fifteen. You need quiet and a clear floor. Move any shoes or furniture away from the wall before you start so you are not stepping over things while you work at eye level.
Step 4: Assign Hooks by Person, Not by Item
The most common mistake I see after a coat rack goes up is loading every hook with one category of item, coats on the left three, bags on the right two, keys on a small hook near the door. That system falls apart within a week because nobody remembers which category goes where when they are rushing out the door. Instead, assign hooks by person. In a household of four, that is four hooks for four people. The fifth hook on the Homode rack (or the leftover hook in a three-person house) becomes the communal hook for shared items like reusable grocery bags, a dog leash, or umbrellas.
Make the assignments visible for the first two weeks. A small strip of painter's tape above each hook labeled with the person's name or initials is enough. After two weeks the habit is built and you can remove the tape. Each person hangs their own coat, their own bag, and their own keys on their own hook. The double-hook design of the Homode rack means each hook point handles a coat on the outer hook and a bag or hat on the inner hook simultaneously, so a family of four can have eight items hanging without any overlap.
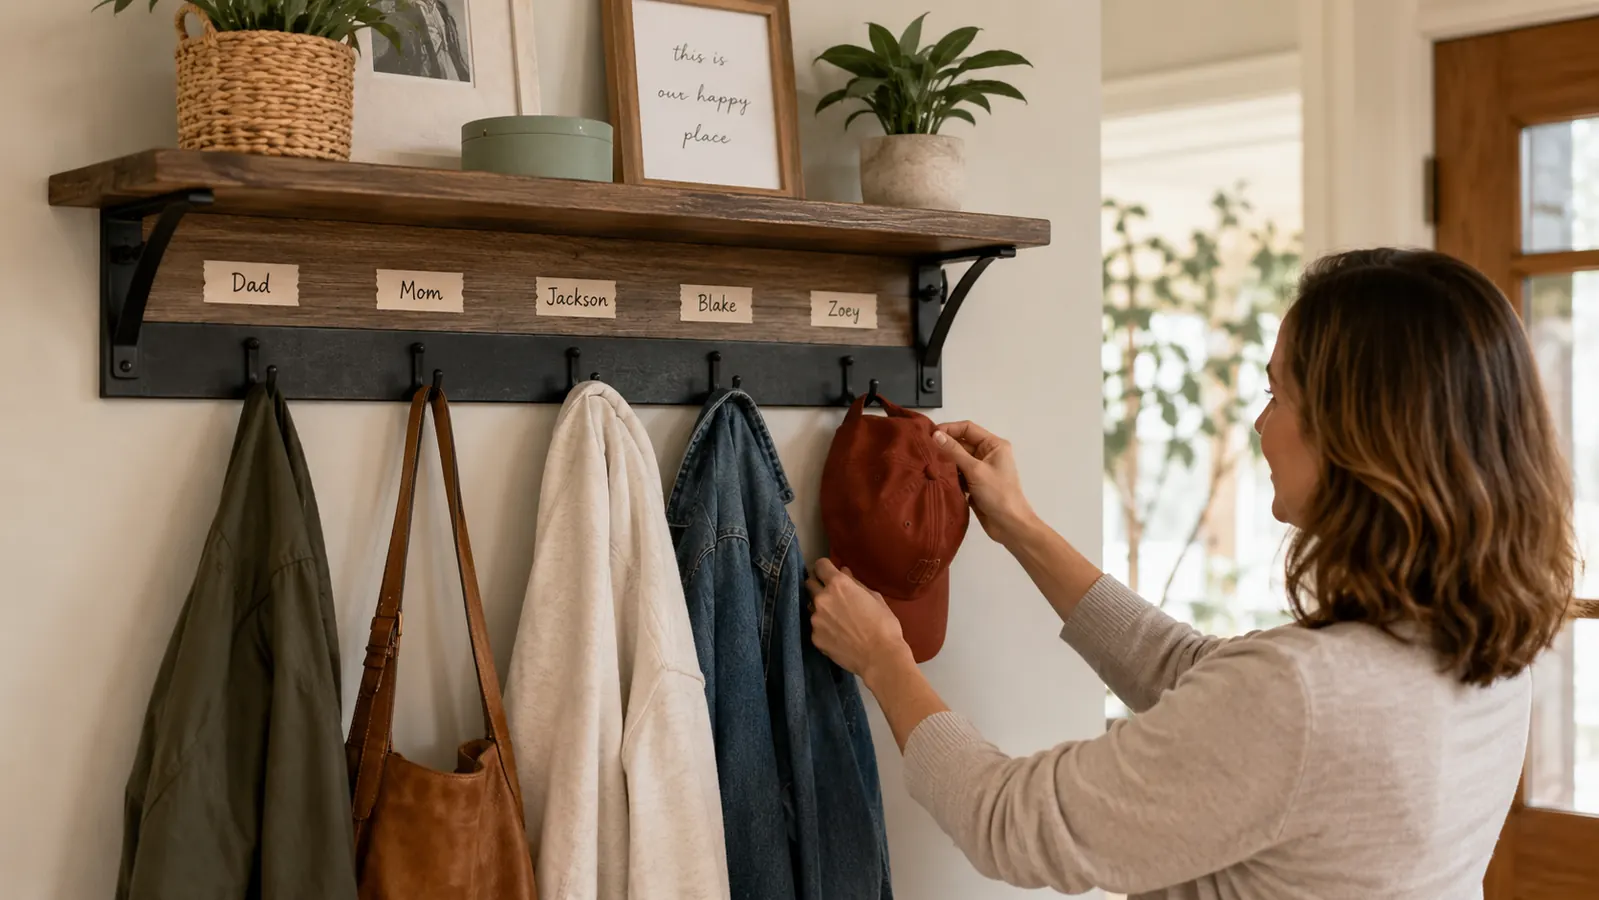
Assign hooks by person, not by item type. One hook per person, every day, without exception. That single rule is the reason some entryways stay clear and others turn back into piles within a week.
Step 5: Style the Shelf So It Works Every Day
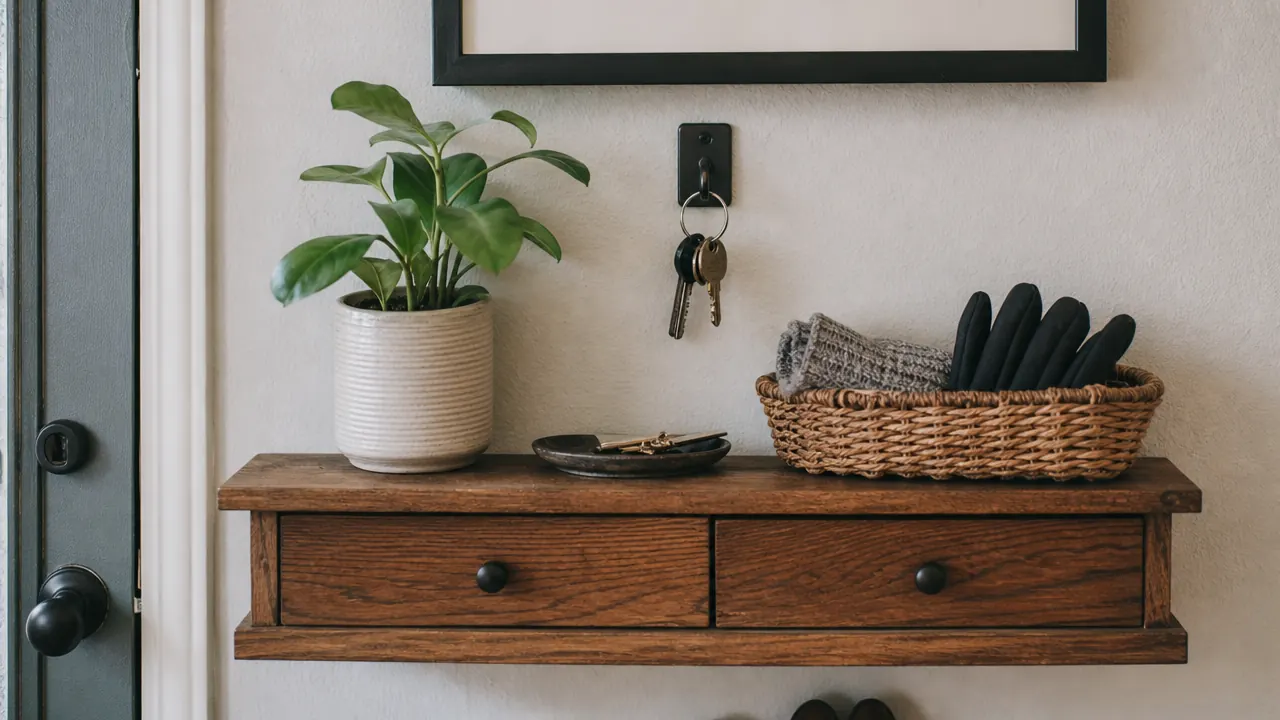
The shelf on the Homode rack is 5 inches deep and 24 inches wide. That is real storage space, not decorative space. Before you put a candle or a little plant up there, decide what functional item lives on that shelf permanently. My first choice is always a small basket or tray for keys. Keys need a landing spot that is always in the same place. A 6-inch oval tray from the dollar section works fine. Keys go in the tray. That is the rule. If you have young kids, the shelf is also a good home for a small charging pad so phones come off pockets and onto the shelf rather than getting left in the car.
After you have placed the functional anchor item, you have room for one or two low-profile decorative pieces. A small potted succulent, a single framed photo, or a short candle. The goal is to make the shelf look intentional so that it does not become a secondary drop zone for mail, sunscreen bottles, and random chargers. If the shelf starts collecting random clutter, pull everything off, put back only the key tray, and enforce a one-in-one-out rule. The shelf should have no more than three items on it at any time.
If you have kids under ten, skip decorative items on the shelf entirely for the first six months. Put a hook-mounted key ring for their backpack straps at the bottom of the rack instead. Small hands grab the hooks, not the shelf, and a vase on the shelf becomes a liability. Keep the shelf for adult items and school paperwork goes in a separate wall-mount file folder nearby.
What Else Helps
A coat rack handles the vertical dimension of your entryway. What it does not handle is the floor. If shoes are the main source of chaos in your entryway, add a low boot tray directly below the rack. A boot tray 24 inches wide sits flush below the hooks and gives shoes a contained landing spot that is easy to sweep. If bags are the problem on the floor, a small wall-mount shelf at 12 inches off the ground on the adjacent wall gives bags a dedicated low perch without adding furniture to walk around. The Homode rack pairs well with either addition because its 24-inch footprint leaves wall space on either side for a second, smaller bracket shelf or a mirror. A mirror at eye level beside a coat rack is one of the most useful things you can add to a small entryway because people check themselves on the way out and actually stop to fix their coat properly instead of grabbing and running.
If your entryway wall is plaster rather than standard drywall, the process is the same but pilot holes require a masonry bit for the first half-inch before switching to a wood bit for the stud itself. Plaster cracks if you drive a screw without pre-drilling. Also, older homes may have studs at 24-inch spacing instead of 16-inch, which means the Homode rack may only hit one stud. In that case, hit the one stud with two screws and use two 75-pound drywall anchors for the remaining holes. The total hold strength is more than adequate for coat rack loads as long as the anchors are installed correctly.
Ready to mount? The Homode rack goes up in under 30 minutes
The Homode 24-inch wall-mount coat rack includes the mounting template, hardware, and five double hooks. Over 2,800 buyers, 4.5-star average. Check today's price and have it on your wall this weekend.
Amazon Check Today's Price on Amazon →